You can attach files to the Issue. Go to the Attachments tab and click on Add Attachments.

1 - To create a new Issue from the main menu, go to the Operations menu and select Issues. You will be able to create an Issue that is related to a Booking and/or Unit and/or Building.
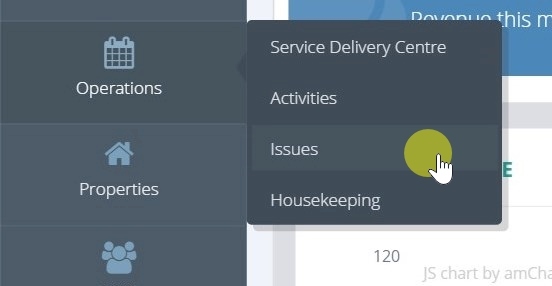
2 - Here you will see a list of all the existing Issues in the system. You can sort and filter on each of the columns to find a particular Issue. To create a new one, click on Add Issue.

1 - To create an Issue related to a Booking, you can also just go straight to the Booking itself. Click on the Issue tab in the Booking.

2 - Here you will see a list of all Issues related to this specific Booking. To create a new Issue, click on the Add Issue button.

This will open the New Issue screen with the Booking already filled in.
1 - In all cases, the New Issue screen contains the follows fields. The next sections will cover what to enter for each field.

2 - Select a type from the drop down. These are the types previously set up in the Admin section. If you are missing some types, please populate Issues types, as described here.


3 - The type you select will have a default priority. This will automatically be populated in the Priority field, and it will also populate the Response Target Date and SLA Deadline Date fields.

4 - If you change the priority, the SLA deadline and Response Target dates will be updated.


5 - Fill in a Subject and Description as appropriate.

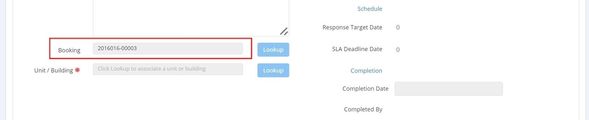
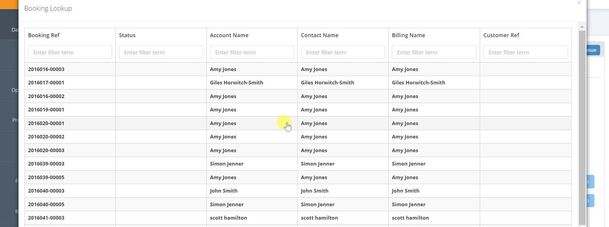
6 - To associate the Issue with a Booking, select the Lookup for Booking and choose from the list.

7 - You must associate the Issue with either a Unit or a Building. Select the Lookup button for the Unit/Building field.

8 - You will be shown a list of Units, filtered to only show the Units that are associated to Room Stays in the Booking that you have selected. If you didn't associate the Issue with a Booking, you would be shown a list of all Units in the system. Each column can be filtered to make it easier to find the Unit you are looking for. Select the Unit you wish to associate the Issue to.
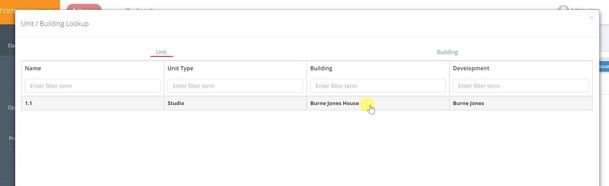
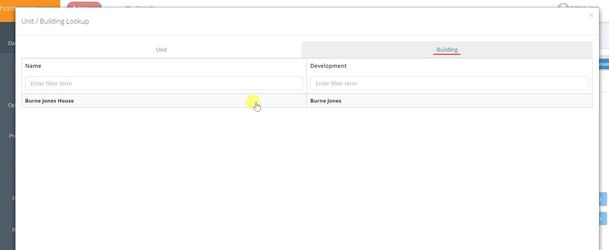
9 - If you would rather associate the Issue with a Building, not a specific Unit, select the Building tab and click on the relevant Building.

10 - Again, the Buildings are filtered to only be the ones that are associated to Room Stays of the Booking you have selected. If you didn't select a Booking, all Buildings would be displayed.
1 - The user currently logged on will be stored as the Reported By User.

2 - Time of Reporting is automatically set to the current date/time.

3 - But should you wish to change this, e.g. because the issue was reported over the weekend and it is logged in the system the following Monday, you can change the date and time by clicking on the field.

4 - You can select who reported the Issue by clicking on the Reported By Contact Lookup.

5 - This will give you a list of all Contacts in the CRM. You can filter on all the lists to help in finding the correct contact. Click on the one that is relevant.

6 - You can also assign the Issue to a user or a team to deal with. Click on the Assignee lookup.

7 - You will be given a list of all users in the system. Select who you wish to assign the issue to.

8 - If you would rather associate the issue to a team, select the Assignee lookup.

9 - Click on the team tab and select the team you wish to associate with.

10 - You can also add notes to the Issue. Type in the note and click on Add Note to save.

All the notes can be viewed at the bottom of the screen and can be removed if required.

11 - Once you save the Issue, several options are available to you.

12 - You can raise an Activity towards resolving the Issue. Please see here for details.

You can attach files to the Issue. Go to the Attachments tab and click on Add Attachments.