
Creating and Managing Users
Video - Creating and Managing Users
Create a New User
1 - Go to Admin menu, User & Team Settings and select Users.
.jpg?version=1&modificationDate=1473175513288&cacheVersion=1&api=v2&width=433&height=250)
2 - This will show you a list of all users in the system. To view or modify any user, just click on the row. To add a new User, click on Add User.

3 - This will give you the New User view, ready for you to fill in.

4 - Fill in the basic information, such as name, username, email address, etc. The password can be changed at a later stage.

5 - Allocate the user to a team by clicking on the search button next to the team field.

6 - Pick the team you wish to allocate them to. You will need to have created teams prior to this step. Here we will select Reservations.

7 - Enable the user if they should be active straight away.

Managing Users
2.0 - Security Roles
1 - Select which access rights the user should have. Please see the User Security Matrix to see what the roles entail.

2 - Save the user.

2.1 - Change User Password
1 - If you would like to change the users password, go back to the user from the Admin menu and select the Change Password button located at the bottom of the page.
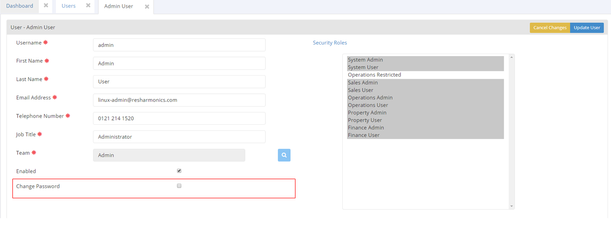
2 - Here you can update the password and then select update user at the top right of the page. (blue box) which will update the password.

2.2 - View Users in a Team
1 - Go to the teams from the Admin menu and click on the team you are interested in.

2 - Click on the 'Users' tab, where you will see all the users associated to that team. Click on the user to view their details.